
Command Line Interfaces (CLI) have become integral tools for developers looking to streamline their workflow. Some of the biggest names in tech, including Vercel, GitHub, Netlify, and Planetscale, offer CLIs that provide a powerful way to interact with their services. As these interfaces grow in popularity, one question surfaces with increasing frequency: How does CLI authentication (auth) work? Whether you are using clerk, next Auth, or other providers, understanding the connection between the user at the terminal and the authentication process is key.
Let's delve into the world of CLI auth, its workings, and code intricacies. Suppose you are getting ready to authenticate your CLI—you might use a command like npx vercel login or, after installation, you simply type vercel login. But what exactly happens under the hood?
The Authentication Dance: A CLI Perspective
Before we walk through the code and get our hands dirty with a demonstration, let's consider the larger picture with the help of a diagram.
The process begins when a user invokes the CLI, which initiates a local port that listens for an incoming connection. Often, this will also result in the user's web browser opening up to a specific URL tailored for authentication—let's say appauthcli.com. This pivotal moment is where web app authentication springs into action.
Here's a quick rundown of what goes down:
The user logs in (or is already logged in) using their credentials.
A unique code, displayed in the terminal, is also shown on the web page for the user to confirm.
Upon confirmation, the authentication journey takes a pivotal turn as a new API key or token is minted.
This key is then shot back to the CLI through the web page, usually in a seamless redirect back to
localhost.
User ----> CLI ----> Auth Web Page ----> Auth Confirmation ----> Token Generation ----> CLI token storage
The token is now securely stored on the user's machine, and each future CLI request proudly wears this token in its header—think of it as a VIP pass for your commands to access the services they need.
From Terminal to Token: A Real-World Example
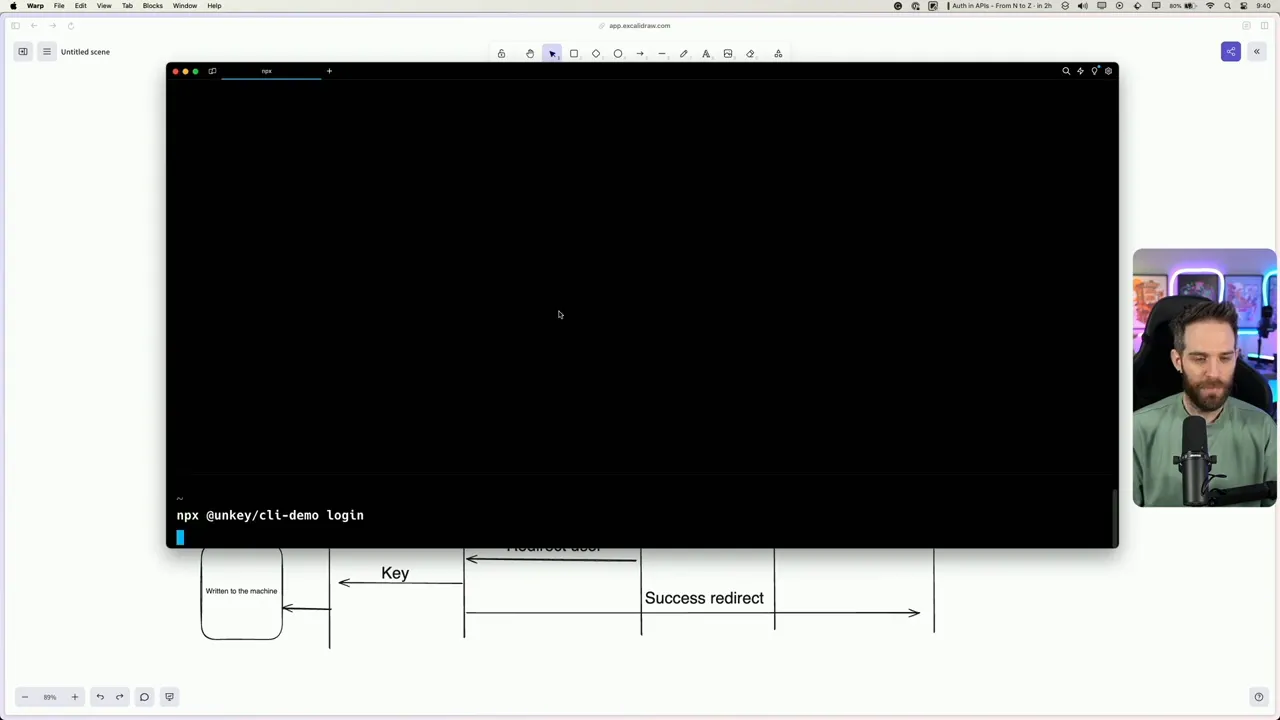
To paint a clearer picture, let's roll up our sleeves and witness a CLI auth process in real-time. Imagine we're using the unkey CLI tool. Here's how it would unfold in your terminal.
npx @unkey/cli demo login
Executing the command flings open a browser window to the authentication provider. If the process hits a snag, don't worry; you can manually enter the provided URL into your browser.
Following the breadcrumbs back to the terminal, you'll spot a confirmation code. Verify that it matches the one on the web and hit that "confirm" button. Upon a successful login, a neat message informs you that the authentication is complete and you can return to the CLI.
Curious about what changed in your home directory? A little ls -a reveals a new .unkey file containing the API key linked to your user.
ls -a ~
You'll find .unkey, tying your CLI session to your authenticated identity.
The Code Behind the Magic
Now, let's dissect the code that powers this authenticating alchemy. The demo's code, housed on GitHub for your perusal, splits into two parts: the web application and the CLI.
The CLI, a simple Node server, creates a file named .unkey and stores your freshly baked token. It all boils down to an auth promise waiting for the token from the web app. Once our auth promise resolves with the key, we celebrate success—or handle cancellation gracefully.
On the web application side, the real fun begins. The user confirms their temporary code, triggering an API call that crafts a brand-new API key. Linking it with the user's ID, we serve it back like a chef presenting a meticulously cooked meal.
        // A snippet from the web app's auth page
if (userVerifiesCode) {
  fetch(`/api/unkey?code=${tempCode}`).then(response => response.json()).then(data => redirectToCLI(data.apiKey));
}
And voilà! You're authenticated and ready to command your CLI with newfound authority.
CLI auth is like a secret handshake between your terminal and the services you use. Master it, and you open up a world of efficiency and control at your fingertips.
As developers, understanding CLI auth mechanisms allows us to harness the full power of our tools, making our interactions with services smoother and more secure. Next time you enter that login command, remember the intricate dance of requests and confirmations happening silently, all to keep your development journey seamless.
Don't forget, if you're keen to explore the intertwining of code and authentication further, the complete code is available on GitHub. And if you found this breakdown helpful, consider subscribing for more insights into the developer's toolkit. Happy coding!